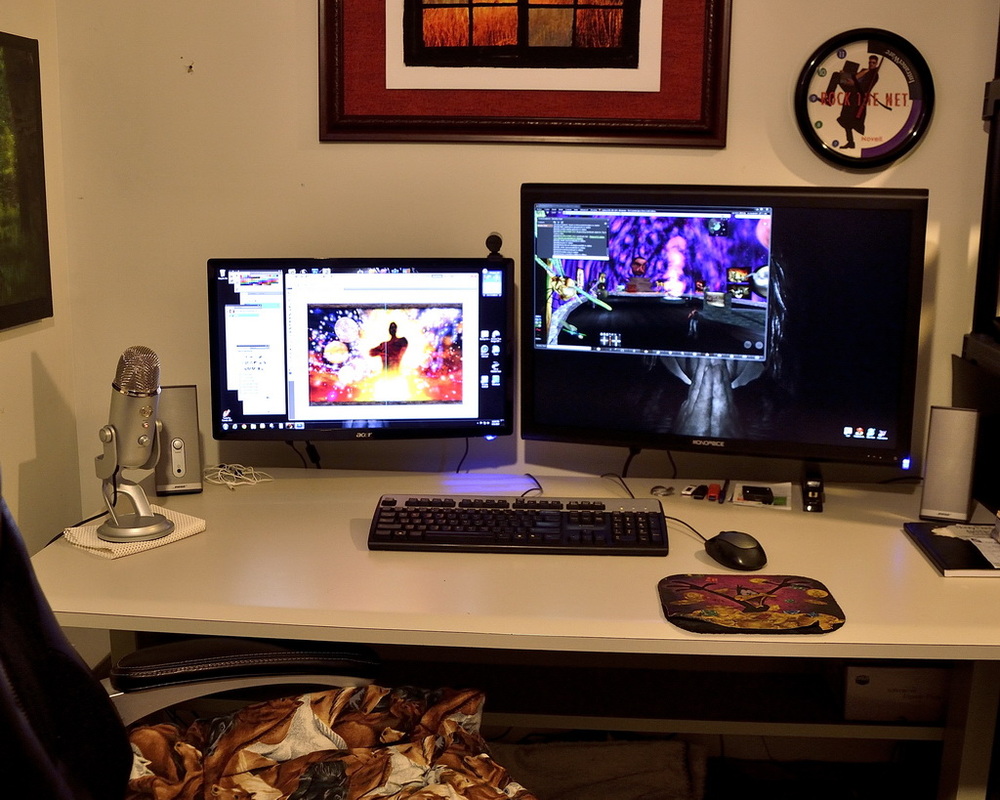
My new desktop layout (click to enlarge)
In my previous blog posting to this one "Taking My Graphics to Next Level", I excitedly announced that I just purchased one of my dream tools / toys for my home PC from Monoprice.com and that I was still anxiously waiting for it to arrive. I also explained in that blog post the difference between a larger HD monitor and this class of ultra-high resolution monitors (the WQHD 2560x1440 or 1600).
Since then my new monitor successfully arrived as I went to the border of the USA to pick it up and bring my new baby back home with me. I got it all unpacked and connected and mounted on the wall. For those thinking of making this kind of investment for a 30" ultra-high resolution monitor, this post is here to provide a small review of my new monitor.
Since then my new monitor successfully arrived as I went to the border of the USA to pick it up and bring my new baby back home with me. I got it all unpacked and connected and mounted on the wall. For those thinking of making this kind of investment for a 30" ultra-high resolution monitor, this post is here to provide a small review of my new monitor.
| A Canadian Picking Up From USA I am Canadian and monoprice.com is an american online retailer. For those of you that are fellow Canucks and buy anything from the USA online, you know the several added costs and inconveniences incurred when shipping in from USA. So many of you already know the hoops we jump through to reduce these major additional costs. For this $629 monitor, monoprice was charging $31 to ship it to an American border town an hour away from us and would have charged $80 to ship to my door. But, since it crosses the border by a transport company (like UPS in this case) there would have also been another $60-ish added on for Brokerage fees. | 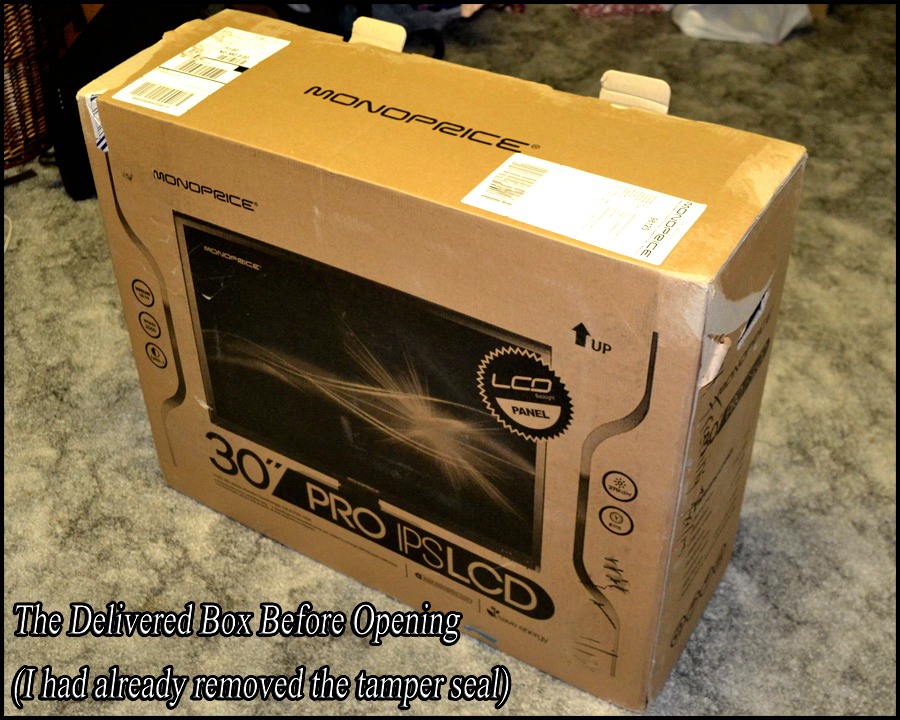
Shipped Package (click to enlarge)
|
Then one also add the Fed & Provincial taxes - which for me is 13% or about another $80 and the Duties for the monitor since it was not made in USA or Mexico - about another $50 By shipping to the US border and picking it up I was able to avoid the $50 in added shipping costs plus the $60 in brokerage fees - less of course the $50 in gas. I could have also avoided the duties and taxes when coming across the border but I would have had to stay 48 hours in the US and that would have negated all the saving. I was also charged $5 from the border town's local US Postal Address delivery depot.
In all, I ended up paying $790 for my $629 monitor (since I already had $US account - there was no added exchange rate fees). This might sound expensive but considering that similar classed monitors start at $1,000 and would have even incurred larger added fees, the $790 is still a HUGE BARGAIN for this monitor.
In all, I ended up paying $790 for my $629 monitor (since I already had $US account - there was no added exchange rate fees). This might sound expensive but considering that similar classed monitors start at $1,000 and would have even incurred larger added fees, the $790 is still a HUGE BARGAIN for this monitor.
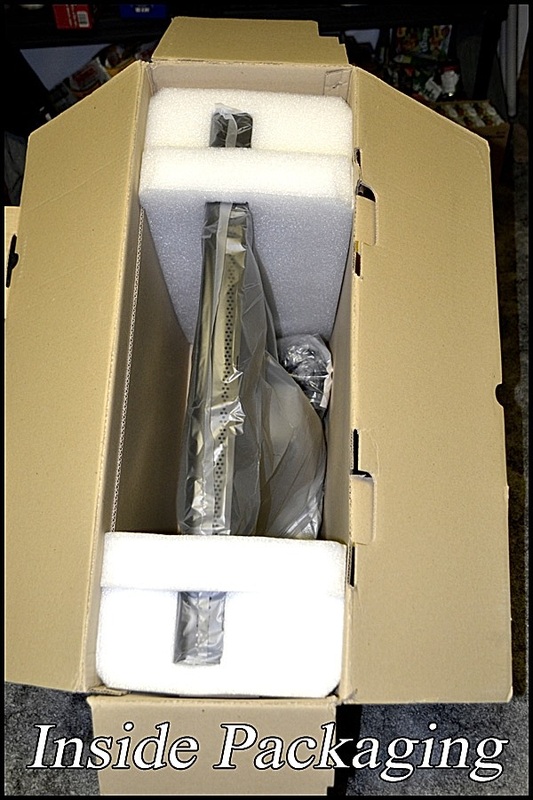
Well protected (click to enlarge)
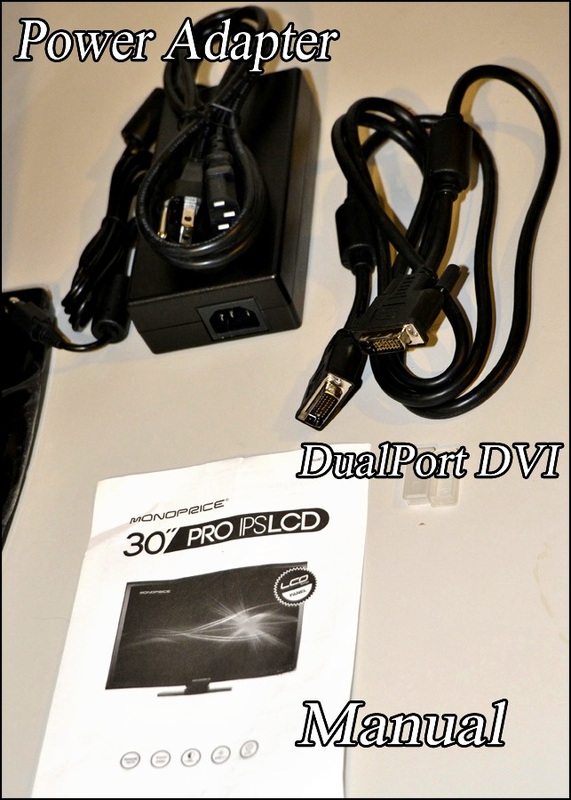
The Contents (click to enlarge)
| Opening the Shipped Monitor The monitor is shipped in an extremely well protected shipping package as you can see in the "Shipped Package" image above. The opening edges were also all taped up with taper-proof tape from monoprice to show if the package had been opened during shipping. The stated weight was 36 lbs. When I opened the top lid you can see how well protected the fragile large monitor is from any sharp severe drops or bumps. And since the monitor was "made in China" by LG for monoprice, it was that much more important that all the components were cellophane wrapped from moisture. The monitor itself is all black with the stand already attached. The case is made of thin pressed steel - not plastic.There are only 3 buttons: POWER, and Backlight Brighter & Dimmer. That's it. The back has a connector for the dual-port DVI and the power adapter. In addition to the monitor, the contents included trhee other items:
|
Plugging In & Turning It On
Setting it up was not difficult. I already had two 23" monitors connected to my PC / ATI HD5770 graphics card. I replaced my 23" LCD monitor and set this new 30" up in its place (just on a stand initially). I was concerned that although my HD5770 technically had the ability to drive 2560x1600, it would not have the horsepower to do it effectively - much less that it was also driving my 23". I pressed my power button and crossed my fingers. I got real nervous when during bootup Windows set both screens into disabled mode. Turns out it was / is a glitch with the 5700 when a disable HDMI device is also connected. I unplugged the HDMI and everything worked!! WHEW!
Windows 7 started up and my new monitor started up and started to amaze me !! My 5770 initially was able to drive both monitors quite well for normal PC windows activities. The OSD (On-Screen Display) options for this monitor are ZERO. As mentioned before, other than the power, there are two basic buttons to make the backlight brighter or dimmer - but pressing them does not bring up any OSD - the screen simply gets brighter or darker.
If set brighter, pure black starts emitting a visible shade of non-black dark grey. But if you set the brightness to this level when the screen is black.... LOOKOUT when you open up a browser window with a lot of white - PUT ON THE SUNGLASSES!
Pretty much all the screen brightness, contrast, and adjustment controls comes from the graphic card's monitor settings. I played with a lot of these settings but generally the best setting leaves the 30" dimmer than the 23" for darker backgrounds because you will become blinded with the extreme brightness if you dont tone down the brightness when the white browsers screens / windows show up.
| WOW! THE SHEER SIZE ! So lets talk about the size. Just setting up the monitor beside the 23" already started to shock me (regardless of the resolution). I took many picture for this blog posting but in all honesty the photos just doesn't capture its true size unless you are sitting right in front of it. To give you all some perspective, click to enlarge the image to the right. That is an actual view from where I would sit in front. I have provided the actual measurements to show the difference in dimensions. Also, the mouse and keyboard help put the 30" in perspective. Simply put: ITSS FRIKKEN BIG !! | 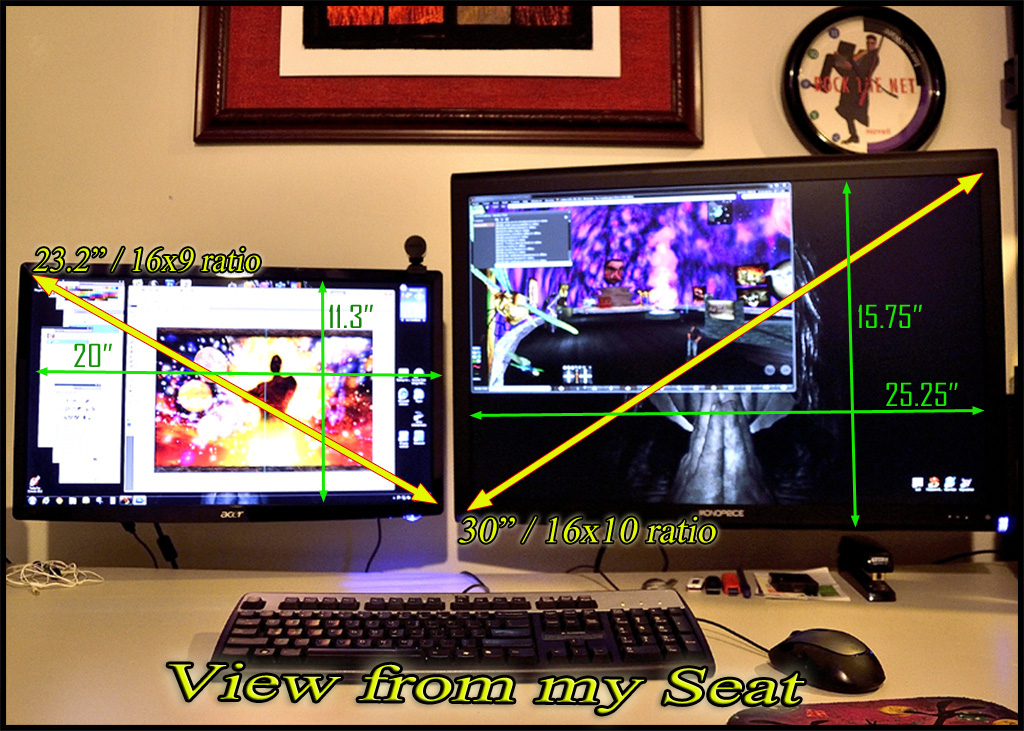
Compare Screen Sizes (Click to enlarge)
|
Comparing the Resolution - Why is More Pixels Better?
I was talking to some fellow SecondLife™ Merchants about my new 30" 2560x1600 monitor and was surprised how some of them had no awareness of how a larger screen by itself does not add real estate - just makes things displayed on the screen larger (and more pixelated at the same time). Some didn't realize that its the major increase in resolution over the 1920x1080 that provides the invaluable added desktop space.
I was talking to some fellow SecondLife™ Merchants about my new 30" 2560x1600 monitor and was surprised how some of them had no awareness of how a larger screen by itself does not add real estate - just makes things displayed on the screen larger (and more pixelated at the same time). Some didn't realize that its the major increase in resolution over the 1920x1080 that provides the invaluable added desktop space.
| Well these photos will hopefully prove the points I was trying to explain on just how much more windows desktop space one can gain from moving to a 2650x1600 resolution from the traditional 1920x1080 monitors that most people buy for their PCs. So the first image to the right combines two photos of my new 30" monitor. The Top half shows the SecondLife™ screen scaled so that its window size is 1920x1080. The bottom half of the screen shows the same SecondLife™ camera angle as above but with the screen maximized and reporting a FireStorm™ screen dimension of 2560x1578 (my caption reported 2650 incorrectly should have said 2560). Notice that although generally the view of the surroundings didn't get wider by simply maxing the screen, all the navigation screens and icons and controls remains the same size and therefore they became a much small portion of the overall screen. In other words, you saw much more of the surroundings with little clutter of viewer controls. The arrows on the screen help point out the increased range of views over the 1920x1080 screen. But the added benefit of being on a much larger sized 30" screen with this resolution means you can zoom out and see far more of the SecondLife™ world without it being too small to see! The following image to the right gives you another perspective and appreciation as to the substantial increase in screen desktop real estate you gain between monitors. I maxed out the SecondLife™ screen on my 23" monitor inn windows mode. Then I simply dragged half of the screen over to the 30" monitor. You can see immediately the magnitude of improved desktop real estate gained from the higher rezzed larger monitor. Finally, to understand why a high rez larger monitor is a major improvement for anyone doing a lot of photo editing on programs like PhotoShop™ or 3D mesh modelling (like I do for SecondLife™ mesh art models using Zbrush as my tool), the large image shows my Zbrush app set to full screen on both my 23" (top half) and 30" (bottom half). When you enlarge the image the arrows I super-imposed illustrates where the side tool menu options end on the 23" and how much more space is given to me on the 30" with the higher resolution. The arrows also show how much more horizontal menu space | 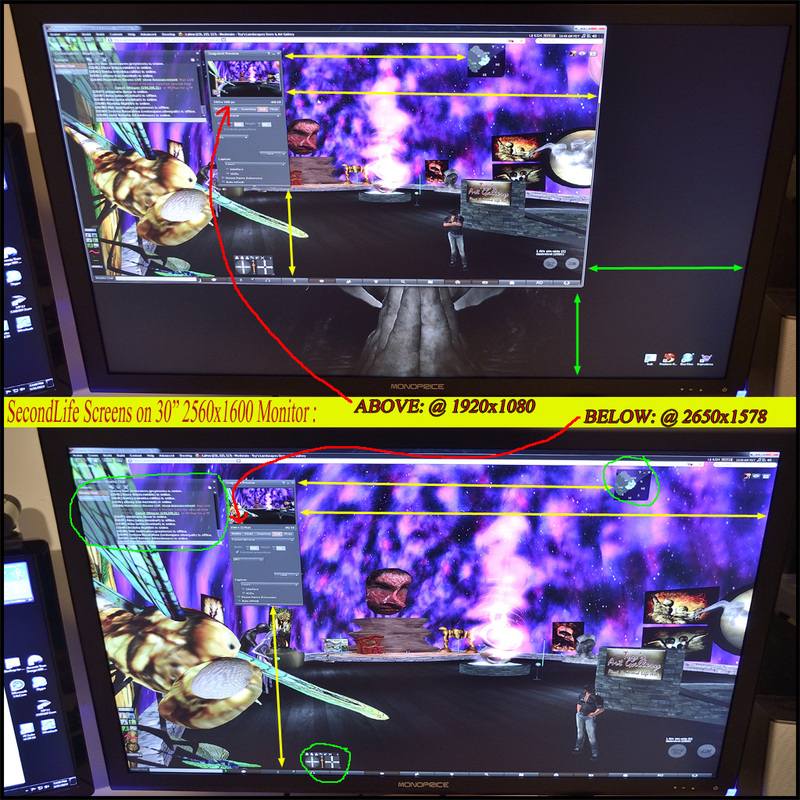
SecondLife screen at 1920 vs 2560 (click to enlarge)
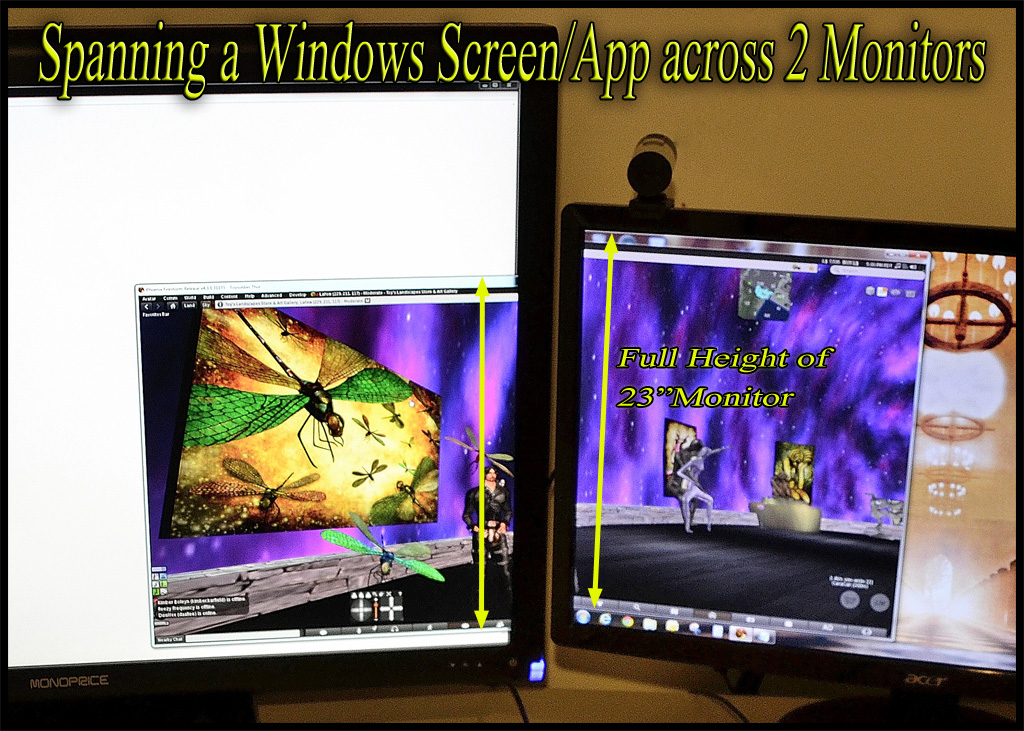
Window spanning two screens (click to enlarge)
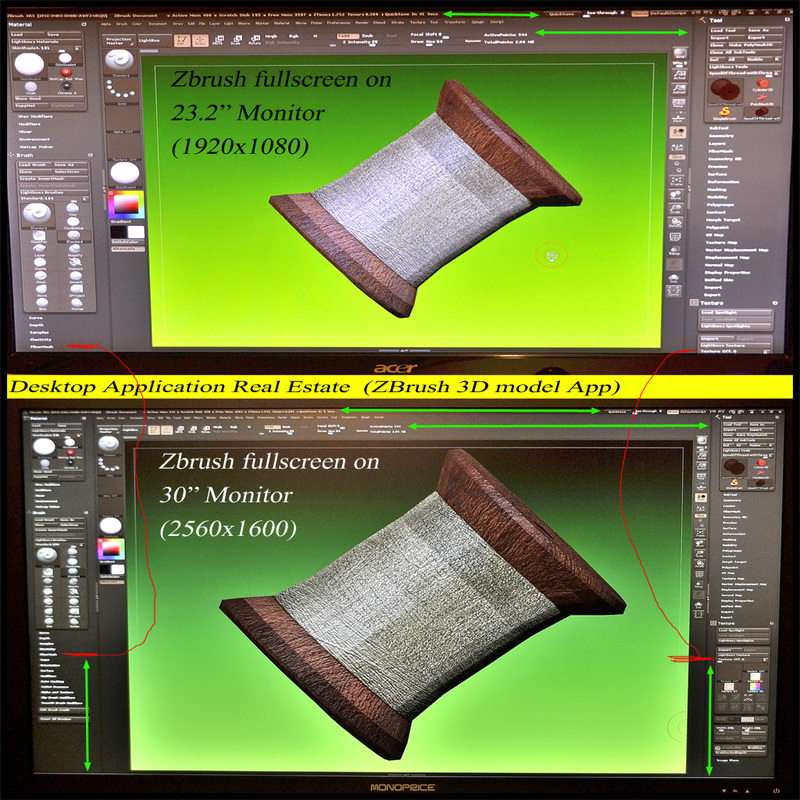
Increased menu space (click to enlarge)
|
is provided to the operator as well as the increased workspace for the model itself.
FINAL OBSERVATIONS & CONCLUSIONS
I have only had the new monitor for the past week and I am still in love with it and appreciating the huge value it provides me on many of my business, graphic arts creation, and entertainment activities! For the price I paid for this monitor, I could not be happier.
That being said, here are a few observations and few To-Does for me:
I hope you all found this blogged review of my new 30" monitor of some value and if the money is available to you and you are a heavy PC graphics artist or gamer - this will be an investment you won't regret!
FINAL OBSERVATIONS & CONCLUSIONS
I have only had the new monitor for the past week and I am still in love with it and appreciating the huge value it provides me on many of my business, graphic arts creation, and entertainment activities! For the price I paid for this monitor, I could not be happier.
That being said, here are a few observations and few To-Does for me:
- The screen clarity is crystal clear, but I am noticing more and more that the ATI HD5770 is just borderline capable of operating the demands that this high rez monitor is placing upon it. I have noticed tht SecondLife™ at full screen resolution causes the screen frame rate often to drop to very low numbers - almost not workable. And, with my plans to attach my HDMI for my TV onto this card as well, I need a more powerful graphics card.
As such, I am going to spend more of my SecondLife™ earnings to buy a new ATI 7950 graphic card. They run about $300 right now but this will give me more than enough horsepower to drive all these monitors. - I decided that in order to regain the deskspace on my computer desk, I bought two wall mounted articulating monitor mount arms for both my 23" and my 30". It was $39 each for a full motion (except vertical adjust) arm that could hold up to 40 lbs of monitor. They had to mount right into a stud in the wall. But I am so happy I did this as it now provides me lots of desktop space!
- Monoprice.com had much cheaper 27" 2560x1440 monitors for about $400. Unfortunately they were constantly out of stock with no end in sight for them to ever replenish. If they were available, I would have bought two of the 27" at $400 each vs this one 30" at $700. The increase Windows real estate would have been mind blowing and at very little increase in price over the 30". I would have even been happy with the single 27" over the 30" considering the major cost savings. But for me that was not an option.
I hope you all found this blogged review of my new 30" monitor of some value and if the money is available to you and you are a heavy PC graphics artist or gamer - this will be an investment you won't regret!


 RSS Feed